> ## Documentation Index
> Fetch the complete documentation index at: https://docs-staging-feat-sdk-reference-docs.mintlify.site/llms.txt
> Use this file to discover all available pages before exploring further.

> Découvrez comment configurer des étapes d’inscription supplémentaires à l’aide de Forms for Actions

# Cas d’utilisation : Configurer des étapes d’inscription supplémentaires à l’aide de Forms

<Card title="Avant de commencer">
  1. Créez une [Machine-to-Machine Application](/docs/fr-ca/get-started/auth0-overview/create-applications/machine-to-machine-apps) avec les scopes suivants activés :

  * `read:users`
  * `update:users`
  * `create:users`
  * `read:users_app_metadata`
  * `update:users_app_metadata`
  * `create:users_app_metadata`

  2. Ajoutez une [connexion Vault](/docs/fr-ca/customize/forms/vault) à l’aide des informations d’identification de l’application M2M.
</Card>

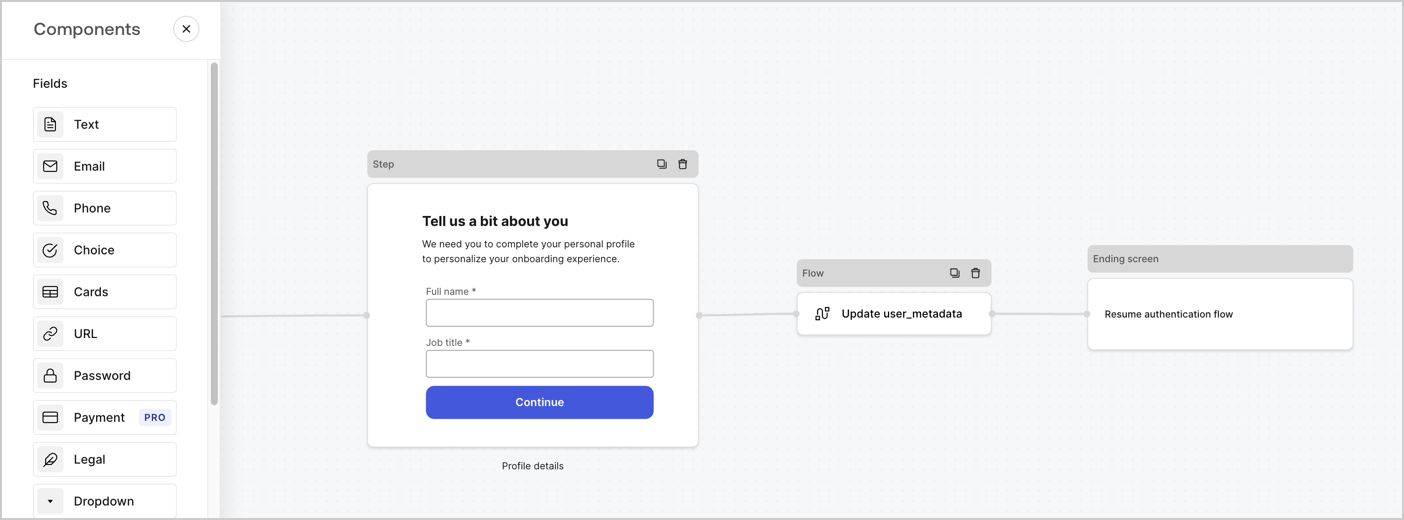
Forms for Actions vous permet d’ajouter des étapes supplémentaires à vos flux d’inscription ou de login, et de les rendre obligatoires avant que les utilisateurs puissent accéder à votre application.
<Frame>
  <img src="https://mintcdn.com/docs-staging-feat-sdk-reference-docs/FZw-B4H1_2E4nPXU/docs/images/cdy7uua7fh8z/ZOQNi6SrEC9OREcBbdiJ3/d79f84fb61acd5473bdf932527e26d58/custom-signup-form.png?fit=max&auto=format&n=FZw-B4H1_2E4nPXU&q=85&s=f964b8e902f0be404e3908183fa6b37f" alt="Dashboard > Actions > Forms > Cas d’utilisation Formulaire d’inscription personnalisé" data-og-width="1404" width="1404" data-og-height="520" height="520" data-path="docs/images/cdy7uua7fh8z/ZOQNi6SrEC9OREcBbdiJ3/d79f84fb61acd5473bdf932527e26d58/custom-signup-form.png" data-optimize="true" data-opv="3" srcset="https://mintcdn.com/docs-staging-feat-sdk-reference-docs/FZw-B4H1_2E4nPXU/docs/images/cdy7uua7fh8z/ZOQNi6SrEC9OREcBbdiJ3/d79f84fb61acd5473bdf932527e26d58/custom-signup-form.png?w=280&fit=max&auto=format&n=FZw-B4H1_2E4nPXU&q=85&s=fca6d3b31bba76f135d2771f4f71534a 280w, https://mintcdn.com/docs-staging-feat-sdk-reference-docs/FZw-B4H1_2E4nPXU/docs/images/cdy7uua7fh8z/ZOQNi6SrEC9OREcBbdiJ3/d79f84fb61acd5473bdf932527e26d58/custom-signup-form.png?w=560&fit=max&auto=format&n=FZw-B4H1_2E4nPXU&q=85&s=dc2ee197bbeeab71cc17bb41da4547e7 560w, https://mintcdn.com/docs-staging-feat-sdk-reference-docs/FZw-B4H1_2E4nPXU/docs/images/cdy7uua7fh8z/ZOQNi6SrEC9OREcBbdiJ3/d79f84fb61acd5473bdf932527e26d58/custom-signup-form.png?w=840&fit=max&auto=format&n=FZw-B4H1_2E4nPXU&q=85&s=8de6a003e2228526bd954207801cdf4a 840w, https://mintcdn.com/docs-staging-feat-sdk-reference-docs/FZw-B4H1_2E4nPXU/docs/images/cdy7uua7fh8z/ZOQNi6SrEC9OREcBbdiJ3/d79f84fb61acd5473bdf932527e26d58/custom-signup-form.png?w=1100&fit=max&auto=format&n=FZw-B4H1_2E4nPXU&q=85&s=c791be65e618d9dc40ab9fa69a7f053e 1100w, https://mintcdn.com/docs-staging-feat-sdk-reference-docs/FZw-B4H1_2E4nPXU/docs/images/cdy7uua7fh8z/ZOQNi6SrEC9OREcBbdiJ3/d79f84fb61acd5473bdf932527e26d58/custom-signup-form.png?w=1650&fit=max&auto=format&n=FZw-B4H1_2E4nPXU&q=85&s=7afddd30981e7740fd6975dde759c47d 1650w, https://mintcdn.com/docs-staging-feat-sdk-reference-docs/FZw-B4H1_2E4nPXU/docs/images/cdy7uua7fh8z/ZOQNi6SrEC9OREcBbdiJ3/d79f84fb61acd5473bdf932527e26d58/custom-signup-form.png?w=2500&fit=max&auto=format&n=FZw-B4H1_2E4nPXU&q=85&s=0fedd7ef0bb5bb69e2d42debc0730cce 2500w" />
</Frame>

Les sections ci-dessous expliquent comment créer des formulaires pour ajouter des étapes d’inscription supplémentaires à l’aide de nœuds et de flux, ainsi que la marche à suivre pour ajouter votre formulaire à une Action [Post Login](/docs/fr-ca/customize/actions/explore-triggers/signup-and-login-triggers/login-trigger).

<h2 id="create-a-form-from-scratch">
  Créer un formulaire à partir de zéro
</h2>

Suivez ces étapes pour créer un formulaire afin de recueillir des renseignements :

1. Ouvrez l’éditeur de formulaires en sélectionnant **Auth0 Dashboard > Actions > Forms.**
2. Sélectionnez **Create Form** > **Start from scratch**.

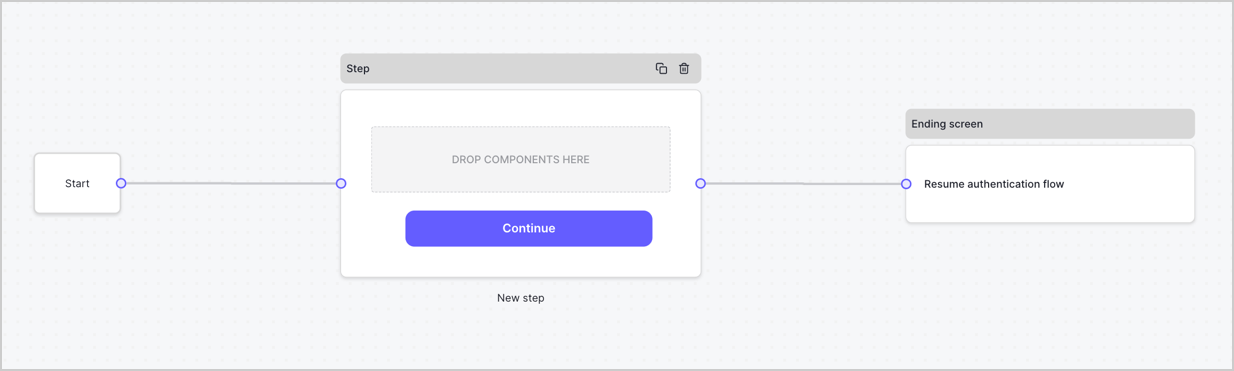
Par défaut, un nouveau formulaire contient un nœud Start, un nœud Step et un nœud Ending screen.
<Frame>
  <img src="https://mintcdn.com/docs-staging-feat-sdk-reference-docs/OMbaL5tGpZJgvr5N/docs/images/cdy7uua7fh8z/2TZ9jSjgEcARFpULI6hz4R/a4319a1bd482f2ee5cc23100fdb2f42c/New-form-Forms-for-action-use-case.png?fit=max&auto=format&n=OMbaL5tGpZJgvr5N&q=85&s=7930a5f9ae10fa47d7561081d69a69b7" alt="Dashboard > Forms > Cas d’utilisation > Form" data-og-width="1234" width="1234" data-og-height="371" height="371" data-path="docs/images/cdy7uua7fh8z/2TZ9jSjgEcARFpULI6hz4R/a4319a1bd482f2ee5cc23100fdb2f42c/New-form-Forms-for-action-use-case.png" data-optimize="true" data-opv="3" srcset="https://mintcdn.com/docs-staging-feat-sdk-reference-docs/OMbaL5tGpZJgvr5N/docs/images/cdy7uua7fh8z/2TZ9jSjgEcARFpULI6hz4R/a4319a1bd482f2ee5cc23100fdb2f42c/New-form-Forms-for-action-use-case.png?w=280&fit=max&auto=format&n=OMbaL5tGpZJgvr5N&q=85&s=f0d31d20b283a49a00612fbbf6c552ce 280w, https://mintcdn.com/docs-staging-feat-sdk-reference-docs/OMbaL5tGpZJgvr5N/docs/images/cdy7uua7fh8z/2TZ9jSjgEcARFpULI6hz4R/a4319a1bd482f2ee5cc23100fdb2f42c/New-form-Forms-for-action-use-case.png?w=560&fit=max&auto=format&n=OMbaL5tGpZJgvr5N&q=85&s=0602416a7aefdef82483407724d97ca1 560w, https://mintcdn.com/docs-staging-feat-sdk-reference-docs/OMbaL5tGpZJgvr5N/docs/images/cdy7uua7fh8z/2TZ9jSjgEcARFpULI6hz4R/a4319a1bd482f2ee5cc23100fdb2f42c/New-form-Forms-for-action-use-case.png?w=840&fit=max&auto=format&n=OMbaL5tGpZJgvr5N&q=85&s=12b6c18920dbda388369b2da8fb5e791 840w, https://mintcdn.com/docs-staging-feat-sdk-reference-docs/OMbaL5tGpZJgvr5N/docs/images/cdy7uua7fh8z/2TZ9jSjgEcARFpULI6hz4R/a4319a1bd482f2ee5cc23100fdb2f42c/New-form-Forms-for-action-use-case.png?w=1100&fit=max&auto=format&n=OMbaL5tGpZJgvr5N&q=85&s=56c65a1edd2830d0a5c6da1b56c925dd 1100w, https://mintcdn.com/docs-staging-feat-sdk-reference-docs/OMbaL5tGpZJgvr5N/docs/images/cdy7uua7fh8z/2TZ9jSjgEcARFpULI6hz4R/a4319a1bd482f2ee5cc23100fdb2f42c/New-form-Forms-for-action-use-case.png?w=1650&fit=max&auto=format&n=OMbaL5tGpZJgvr5N&q=85&s=e3351859398f5d778530eb8420ded8dd 1650w, https://mintcdn.com/docs-staging-feat-sdk-reference-docs/OMbaL5tGpZJgvr5N/docs/images/cdy7uua7fh8z/2TZ9jSjgEcARFpULI6hz4R/a4319a1bd482f2ee5cc23100fdb2f42c/New-form-Forms-for-action-use-case.png?w=2500&fit=max&auto=format&n=OMbaL5tGpZJgvr5N&q=85&s=59ca8d687803a97c1f68bdcfad3ceaef 2500w" />
</Frame>

<h3 id="configure-the-step-node">
  Configurer le nœud Step
</h3>

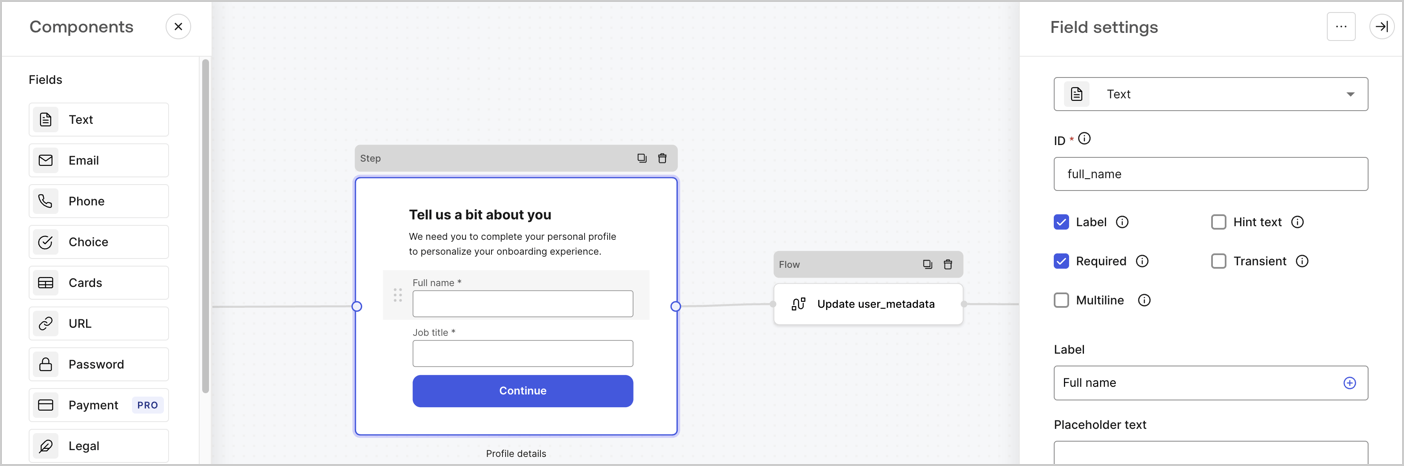
Le nœud Step est l’interface graphique visible par les utilisateurs. Ajoutez des [champs](/docs/fr-ca/customize/forms/nodes-and-components) au nœud Step pour recueillir le nom complet et le titre du poste de l’utilisateur en suivant ces étapes :

1. Faites glisser un champ **Texte enrichi** du **menu Components** vers le nœud **Step**.

   * **Texte enrichi** : Saisissez un message personnalisé.
   * Sélectionnez **Enregistrer**.
2. Faites glisser un champ **Texte** vers le nœud **Step**.

   * **ID** : Saisissez `full_name`.
   * **Étiquette** : Saisissez `Full name`.
   * **Étiquette** : Cochez la case.
   * **Obligatoire** : Cochez la case.
   * Sélectionnez **Enregistrer**.
3. Faites glisser un champ **Texte** vers le nœud **Step**.

   * **ID** : Saisissez `job_title`.
   * **Étiquette** : Saisissez `Job title.`
   * **Étiquette** : Cochez la case.
   * **Obligatoire** : Cochez la case.
   * Sélectionnez **Enregistrer**.
4. Sélectionnez **Publier** pour enregistrer.
<Frame>
  <img src="https://mintcdn.com/docs-staging-feat-sdk-reference-docs/7XeQ3Zd4LUFArOyz/docs/images/cdy7uua7fh8z/6Kcn0ai9fsVsqHwZpTGByG/37cbf4ffee63a7010926b15f06dd20ac/custom-signup-step-node.png?fit=max&auto=format&n=7XeQ3Zd4LUFArOyz&q=85&s=3700ea81637ccc564d5a5cf16035fa7f" alt="Dashboard > Actions > Forms > cas d’utilisation Custom Signup étapes nœud Step" data-og-width="1404" width="1404" data-og-height="466" height="466" data-path="docs/images/cdy7uua7fh8z/6Kcn0ai9fsVsqHwZpTGByG/37cbf4ffee63a7010926b15f06dd20ac/custom-signup-step-node.png" data-optimize="true" data-opv="3" srcset="https://mintcdn.com/docs-staging-feat-sdk-reference-docs/7XeQ3Zd4LUFArOyz/docs/images/cdy7uua7fh8z/6Kcn0ai9fsVsqHwZpTGByG/37cbf4ffee63a7010926b15f06dd20ac/custom-signup-step-node.png?w=280&fit=max&auto=format&n=7XeQ3Zd4LUFArOyz&q=85&s=7e9f5daa6170935f840e27104c6faedf 280w, https://mintcdn.com/docs-staging-feat-sdk-reference-docs/7XeQ3Zd4LUFArOyz/docs/images/cdy7uua7fh8z/6Kcn0ai9fsVsqHwZpTGByG/37cbf4ffee63a7010926b15f06dd20ac/custom-signup-step-node.png?w=560&fit=max&auto=format&n=7XeQ3Zd4LUFArOyz&q=85&s=6f9ba264011ebf34ddd136b4040a0fe6 560w, https://mintcdn.com/docs-staging-feat-sdk-reference-docs/7XeQ3Zd4LUFArOyz/docs/images/cdy7uua7fh8z/6Kcn0ai9fsVsqHwZpTGByG/37cbf4ffee63a7010926b15f06dd20ac/custom-signup-step-node.png?w=840&fit=max&auto=format&n=7XeQ3Zd4LUFArOyz&q=85&s=39b1809d0b8c91ab47b531a5fe5119f9 840w, https://mintcdn.com/docs-staging-feat-sdk-reference-docs/7XeQ3Zd4LUFArOyz/docs/images/cdy7uua7fh8z/6Kcn0ai9fsVsqHwZpTGByG/37cbf4ffee63a7010926b15f06dd20ac/custom-signup-step-node.png?w=1100&fit=max&auto=format&n=7XeQ3Zd4LUFArOyz&q=85&s=146c87762f6b7dac4da3baaca955d846 1100w, https://mintcdn.com/docs-staging-feat-sdk-reference-docs/7XeQ3Zd4LUFArOyz/docs/images/cdy7uua7fh8z/6Kcn0ai9fsVsqHwZpTGByG/37cbf4ffee63a7010926b15f06dd20ac/custom-signup-step-node.png?w=1650&fit=max&auto=format&n=7XeQ3Zd4LUFArOyz&q=85&s=38af16c20d602060b404dee857b0083f 1650w, https://mintcdn.com/docs-staging-feat-sdk-reference-docs/7XeQ3Zd4LUFArOyz/docs/images/cdy7uua7fh8z/6Kcn0ai9fsVsqHwZpTGByG/37cbf4ffee63a7010926b15f06dd20ac/custom-signup-step-node.png?w=2500&fit=max&auto=format&n=7XeQ3Zd4LUFArOyz&q=85&s=0898d108566f3772a71a7f2193658dae 2500w" />
</Frame>

<h3 id="configure-the-flow-node">
  Configurer le nœud Flow
</h3>

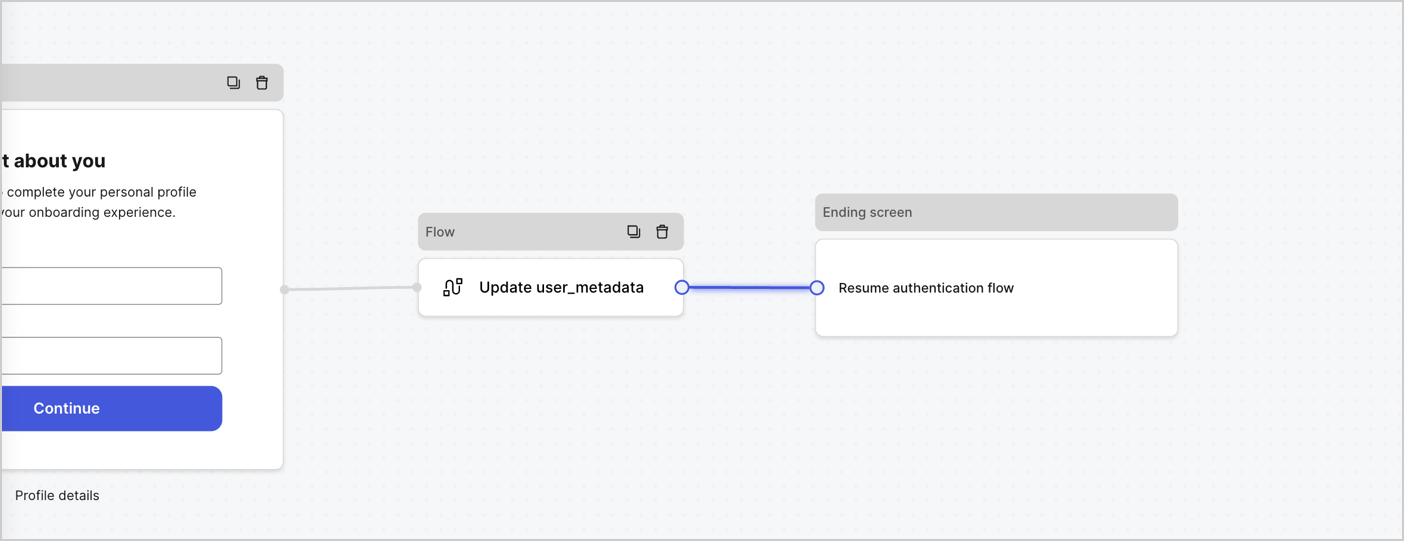
Ajoutez un nœud **Flow** après le nœud **Step** pour mettre à jour `user_metadata` et reprendre le flux d’authentification en suivant ces étapes :

1. Sélectionnez **Flow** au bas de l’éditeur de formulaires.
2. Supprimez le lien existant entre les nœuds **Step** et **Ending Screen**.
3. Sélectionnez le nouveau **Flow** > **Click to add a flow** > **Create a new flow.**

   * Entrez `Update user_metadata` dans le champ **Name**.
   * Sélectionnez **Create**.
   * Sélectionnez **Save**.
4. Liez le nœud **Flow** aux nœuds **Step** et **Ending Screen**, comme illustré ci-dessous.
5. Sélectionnez **Publish** pour enregistrer.
<Frame>
  <img src="https://mintcdn.com/docs-staging-feat-sdk-reference-docs/jWAKKM631THF40NN/docs/images/cdy7uua7fh8z/4nTdYdA2Hu5vK65smkdvJg/db3294ebc25a7c2636be96362a3ea56e/custom-signup-step-flow.png?fit=max&auto=format&n=jWAKKM631THF40NN&q=85&s=96a0bb087fd6d4c3c469599e8d1a6dc7" alt="Dashboard > Actions > Forms > Cas d’usage Custom Signup Step Update User metadata flow" data-og-width="1404" width="1404" data-og-height="541" height="541" data-path="docs/images/cdy7uua7fh8z/4nTdYdA2Hu5vK65smkdvJg/db3294ebc25a7c2636be96362a3ea56e/custom-signup-step-flow.png" data-optimize="true" data-opv="3" srcset="https://mintcdn.com/docs-staging-feat-sdk-reference-docs/jWAKKM631THF40NN/docs/images/cdy7uua7fh8z/4nTdYdA2Hu5vK65smkdvJg/db3294ebc25a7c2636be96362a3ea56e/custom-signup-step-flow.png?w=280&fit=max&auto=format&n=jWAKKM631THF40NN&q=85&s=bee971181e5489143fec3f09d82eb40f 280w, https://mintcdn.com/docs-staging-feat-sdk-reference-docs/jWAKKM631THF40NN/docs/images/cdy7uua7fh8z/4nTdYdA2Hu5vK65smkdvJg/db3294ebc25a7c2636be96362a3ea56e/custom-signup-step-flow.png?w=560&fit=max&auto=format&n=jWAKKM631THF40NN&q=85&s=7d574b9187296740c679d8e10caa873c 560w, https://mintcdn.com/docs-staging-feat-sdk-reference-docs/jWAKKM631THF40NN/docs/images/cdy7uua7fh8z/4nTdYdA2Hu5vK65smkdvJg/db3294ebc25a7c2636be96362a3ea56e/custom-signup-step-flow.png?w=840&fit=max&auto=format&n=jWAKKM631THF40NN&q=85&s=50bfbf40024651806682b8e2f116d0f8 840w, https://mintcdn.com/docs-staging-feat-sdk-reference-docs/jWAKKM631THF40NN/docs/images/cdy7uua7fh8z/4nTdYdA2Hu5vK65smkdvJg/db3294ebc25a7c2636be96362a3ea56e/custom-signup-step-flow.png?w=1100&fit=max&auto=format&n=jWAKKM631THF40NN&q=85&s=dd8ed516d10cb2ed9e8cc5ace01869bf 1100w, https://mintcdn.com/docs-staging-feat-sdk-reference-docs/jWAKKM631THF40NN/docs/images/cdy7uua7fh8z/4nTdYdA2Hu5vK65smkdvJg/db3294ebc25a7c2636be96362a3ea56e/custom-signup-step-flow.png?w=1650&fit=max&auto=format&n=jWAKKM631THF40NN&q=85&s=d2fcc8db4c04beeca811d4ca2d63e299 1650w, https://mintcdn.com/docs-staging-feat-sdk-reference-docs/jWAKKM631THF40NN/docs/images/cdy7uua7fh8z/4nTdYdA2Hu5vK65smkdvJg/db3294ebc25a7c2636be96362a3ea56e/custom-signup-step-flow.png?w=2500&fit=max&auto=format&n=jWAKKM631THF40NN&q=85&s=a93d698bd1e52933476c757940eead3c 2500w" />
</Frame>

Ajoutez une action Auth0 **Update user** au flux en suivant ces étapes :

1. Sélectionnez le **Flow** **Update user\_metadata** > **Edit flow** pour ouvrir l’éditeur de flux dans un nouvel onglet.
2. Sous StartAction, sélectionnez l’icône **+** pour ajouter une Action **Update user**. Remplissez les champs ci-dessous, puis sélectionnez **Save** pour continuer.

   * **Connection** : Dans la liste déroulante, sélectionnez la connexion Vault vers votre application M2M.

   * **User ID** : Entrez `{{context.user.user_id}}`.

   * **Body** : Copiez-collez le code suivant pour mettre à jour `user_metadata` avec les propriétés `full_name` et `job_title`.

     ```json lines theme={null}
     {
       "user_metadata": {
         "full_name": "{{fields.full_name}}",
         "job_title": "{{fields.job_title}}"
       }
     }
     ```

   * Sélectionnez **Save**.
3. Sélectionnez Publish pour enregistrer.

<h2 id="retrieve-your-form-render-code">
  Récupérez le code de rendu de votre formulaire
</h2>

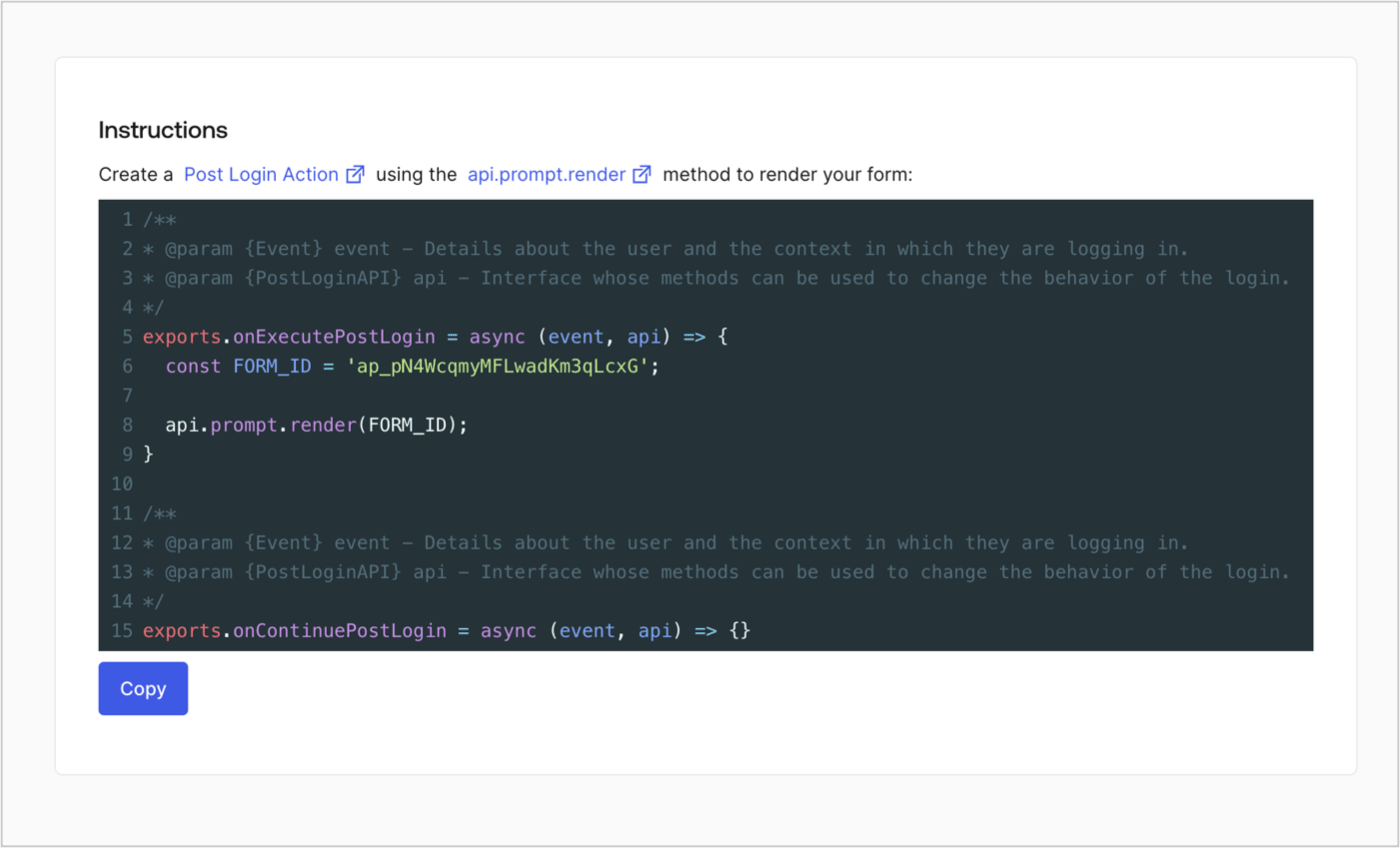
Récupérez le code de rendu de votre formulaire pour afficher le formulaire visuellement à l’aide d’une Action Post Login personnalisée en suivant ces étapes :

* Dans l’éditeur de formulaires, sélectionnez **`<> Render`**.
* Sélectionnez **Copy**.
<Frame>
  <img src="https://mintcdn.com/docs-staging-feat-sdk-reference-docs/OMbaL5tGpZJgvr5N/docs/images/cdy7uua7fh8z/2EIUzc539sq9lwoTKbjoJv/496a864c0fc44a782c9cadca119dbfb0/embed.png?fit=max&auto=format&n=OMbaL5tGpZJgvr5N&q=85&s=c3f01a0a25be9003d924d1fd36528db5" alt="Dashboard > Actions > Forms > Form > Embed" data-og-width="1400" width="1400" data-og-height="848" height="848" data-path="docs/images/cdy7uua7fh8z/2EIUzc539sq9lwoTKbjoJv/496a864c0fc44a782c9cadca119dbfb0/embed.png" data-optimize="true" data-opv="3" srcset="https://mintcdn.com/docs-staging-feat-sdk-reference-docs/OMbaL5tGpZJgvr5N/docs/images/cdy7uua7fh8z/2EIUzc539sq9lwoTKbjoJv/496a864c0fc44a782c9cadca119dbfb0/embed.png?w=280&fit=max&auto=format&n=OMbaL5tGpZJgvr5N&q=85&s=7d74b1f31c6130dd37392e365d4a6ead 280w, https://mintcdn.com/docs-staging-feat-sdk-reference-docs/OMbaL5tGpZJgvr5N/docs/images/cdy7uua7fh8z/2EIUzc539sq9lwoTKbjoJv/496a864c0fc44a782c9cadca119dbfb0/embed.png?w=560&fit=max&auto=format&n=OMbaL5tGpZJgvr5N&q=85&s=4bd4e48eb66f5ccb1aee3fbefc4ca7f1 560w, https://mintcdn.com/docs-staging-feat-sdk-reference-docs/OMbaL5tGpZJgvr5N/docs/images/cdy7uua7fh8z/2EIUzc539sq9lwoTKbjoJv/496a864c0fc44a782c9cadca119dbfb0/embed.png?w=840&fit=max&auto=format&n=OMbaL5tGpZJgvr5N&q=85&s=94f7304ec285f277adac0f3fa554055f 840w, https://mintcdn.com/docs-staging-feat-sdk-reference-docs/OMbaL5tGpZJgvr5N/docs/images/cdy7uua7fh8z/2EIUzc539sq9lwoTKbjoJv/496a864c0fc44a782c9cadca119dbfb0/embed.png?w=1100&fit=max&auto=format&n=OMbaL5tGpZJgvr5N&q=85&s=5cd7a64e06c0ad06439f18770b9fc2f5 1100w, https://mintcdn.com/docs-staging-feat-sdk-reference-docs/OMbaL5tGpZJgvr5N/docs/images/cdy7uua7fh8z/2EIUzc539sq9lwoTKbjoJv/496a864c0fc44a782c9cadca119dbfb0/embed.png?w=1650&fit=max&auto=format&n=OMbaL5tGpZJgvr5N&q=85&s=ab8d06113203280105a4c67ff34ea3da 1650w, https://mintcdn.com/docs-staging-feat-sdk-reference-docs/OMbaL5tGpZJgvr5N/docs/images/cdy7uua7fh8z/2EIUzc539sq9lwoTKbjoJv/496a864c0fc44a782c9cadca119dbfb0/embed.png?w=2500&fit=max&auto=format&n=OMbaL5tGpZJgvr5N&q=85&s=1de46609e35d2171c7e768565d356ff3 2500w" />
</Frame>

<h2 id="create-a-post-login-action">
  Créer une Action Post Login
</h2>

Créez une Action post-login pour afficher votre formulaire en suivant ces étapes :

1. Accédez à **Auth0 Dashboard > Actions > Flows > Login.**
2. Sélectionnez l’icône **+**, puis **Build from scratch** :

   * **Name** : Entrez `Render Additional Signup Form`.
   * **Trigger** : Sélectionnez `Login / Post Login`.
   * **Runtime** : Sélectionnez la version recommandée.
3. Sélectionnez **Create**.

Pour configurer l’Action post-login :

1. Supprimez le code existant dans l’éditeur de code.
2. Collez le code de rendu du formulaire dans l’éditeur de code.
3. Modifiez le code pour définir la logique conditionnelle qui affichera le formulaire.

   ```javascript lines theme={null}
   /**
   * @param {Event} event - Détails sur l’utilisateur et le contexte dans lequel il se connecte.
   * @param {PostLoginAPI} api - Interface dont les méthodes peuvent être utilisées pour modifier le comportement du processus de connexion.
   */
   exports.onExecutePostLogin = async (event, api) => {
     const FORM_ID = 'REPLACE_WITH_YOUR_FORM_ID';

     if (
       !event.user.user_metadata.full_name &&
       !event.user.user_metadata.job_title
     ) {
       api.prompt.render(FORM_ID);
     }
   }

   exports.onContinuePostLogin = async (event, api) => { }
   ```

   <Callout icon="file-lines" color="#0EA5E9" iconType="regular">
     L’exemple de code ci-dessus affichera le formulaire si les propriétés `full_name` et `job_title` sont absentes des métadonnées utilisateur.
   </Callout>
4. Sélectionnez **Deploy.**
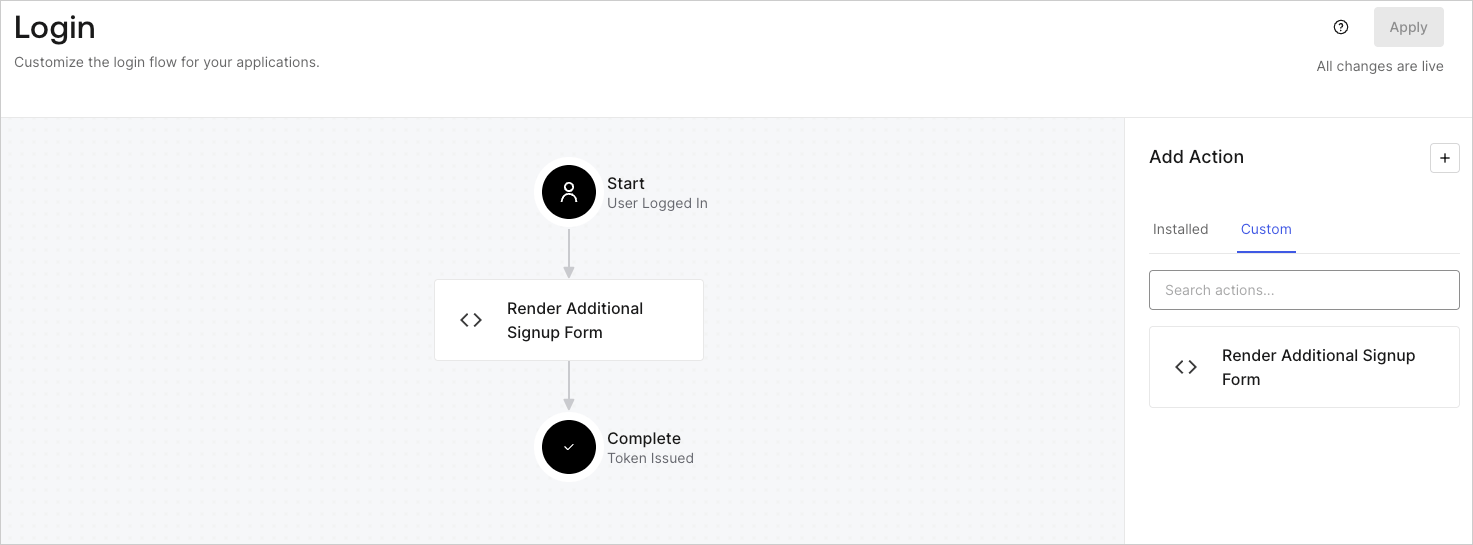
5. Glissez-déposez l’Action **Render Additional Signup Form** dans le flux **Login**.
   <Frame>
     <img src="https://mintcdn.com/docs-staging-feat-sdk-reference-docs/po5ocnRNTrslIk5C/docs/images/cdy7uua7fh8z/1WBOicIOcH98hKj6Lq9HF2/4951e30a0cc08c7c5daa0116eaa17e11/Screenshot_2024-03-01_at_15.48.00.png?fit=max&auto=format&n=po5ocnRNTrslIk5C&q=85&s=894790235492d1b822ee9e393adb5ee6" alt="Dashboard > Forms > Use Cases Custom Signup Steps Login Flow" data-og-width="1473" width="1473" data-og-height="545" height="545" data-path="docs/images/cdy7uua7fh8z/1WBOicIOcH98hKj6Lq9HF2/4951e30a0cc08c7c5daa0116eaa17e11/Screenshot_2024-03-01_at_15.48.00.png" data-optimize="true" data-opv="3" srcset="https://mintcdn.com/docs-staging-feat-sdk-reference-docs/po5ocnRNTrslIk5C/docs/images/cdy7uua7fh8z/1WBOicIOcH98hKj6Lq9HF2/4951e30a0cc08c7c5daa0116eaa17e11/Screenshot_2024-03-01_at_15.48.00.png?w=280&fit=max&auto=format&n=po5ocnRNTrslIk5C&q=85&s=46e4ebf40c78457de103469f69d30165 280w, https://mintcdn.com/docs-staging-feat-sdk-reference-docs/po5ocnRNTrslIk5C/docs/images/cdy7uua7fh8z/1WBOicIOcH98hKj6Lq9HF2/4951e30a0cc08c7c5daa0116eaa17e11/Screenshot_2024-03-01_at_15.48.00.png?w=560&fit=max&auto=format&n=po5ocnRNTrslIk5C&q=85&s=0e93d3e751bf08f863b09ed50b2d3280 560w, https://mintcdn.com/docs-staging-feat-sdk-reference-docs/po5ocnRNTrslIk5C/docs/images/cdy7uua7fh8z/1WBOicIOcH98hKj6Lq9HF2/4951e30a0cc08c7c5daa0116eaa17e11/Screenshot_2024-03-01_at_15.48.00.png?w=840&fit=max&auto=format&n=po5ocnRNTrslIk5C&q=85&s=2c188b754c7ef30e6222d04a1efa5ae2 840w, https://mintcdn.com/docs-staging-feat-sdk-reference-docs/po5ocnRNTrslIk5C/docs/images/cdy7uua7fh8z/1WBOicIOcH98hKj6Lq9HF2/4951e30a0cc08c7c5daa0116eaa17e11/Screenshot_2024-03-01_at_15.48.00.png?w=1100&fit=max&auto=format&n=po5ocnRNTrslIk5C&q=85&s=663c8ba186e39aba1cdd74f2366adf7b 1100w, https://mintcdn.com/docs-staging-feat-sdk-reference-docs/po5ocnRNTrslIk5C/docs/images/cdy7uua7fh8z/1WBOicIOcH98hKj6Lq9HF2/4951e30a0cc08c7c5daa0116eaa17e11/Screenshot_2024-03-01_at_15.48.00.png?w=1650&fit=max&auto=format&n=po5ocnRNTrslIk5C&q=85&s=2293c2a81f90f99e681611fa01b014ee 1650w, https://mintcdn.com/docs-staging-feat-sdk-reference-docs/po5ocnRNTrslIk5C/docs/images/cdy7uua7fh8z/1WBOicIOcH98hKj6Lq9HF2/4951e30a0cc08c7c5daa0116eaa17e11/Screenshot_2024-03-01_at_15.48.00.png?w=2500&fit=max&auto=format&n=po5ocnRNTrslIk5C&q=85&s=9fd4448563e4e24d31e0568479ef7a0e 2500w" />
   </Frame>
6. Sélectionnez **Apply**.

<h3 id="test-implementation">
  Tester la mise en œuvre
</h3>

Testez la mise en œuvre en suivant ces étapes :

* Inscrivez un nouvel utilisateur à une application.
* L’Action post-login dans le flux de Login affichera le formulaire et demandera ces renseignements.
* Sélectionnez **<Tooltip tip="Auth0 Dashboard : l’interface principale d’Auth0 pour configurer vos services." cta="Voir le glossaire" href="/docs/fr-ca/glossary?term=Auth0+Dashboard">Auth0 Dashboard</Tooltip> > User Management > Users,** repérez le nouvel utilisateur et vérifiez que ses attributs `full_name` et `job_title` contiennent les renseignements saisis à l’étape d’inscription supplémentaire.
